Blog

RSS

An index of website security features

November 24th, 2022

I recently took a bit of dive into website security. As the developer of a website, of course I'd like my website to be secure, even if it doesn't handle any sensitive user data. It's also just a fun way to learn more about how the web we use every day works. I read about and implemented a number of security features that I gathered from various blogs, lists, and validation tools, and I wanted to collect them in one spot for my own reference and for anyone else who might find them useful.

I'll include a few words about what each of them do, but Google will get you all the in-depth information you need, so this is mostly intended as an index of some features that exist so you can look into them more.

Example code is in PHP.

This list is certainly not exhaustive. Here are a few other sources I referenced:

CSP (Content Security Policy)

The Content Security Policy is an HTTP header that decribes what types of media, scripts, styles, and other content your page will have on it. This allows the user's browser to block any unexpected content that may have somehow been injected by an attacker (maybe in a forum post, or via an XSS attack).

Every HTML page served should have a CSP. My workflow for adding them is to add the following maximally-restrictive CSP, load the page in a browser, check the developer console for CSP errors, and add entries to permit those things. For embedded styles or scripts, the console will report a hash you can add to the CSP.

header("Content-Security-Policy: "
	."default-src 'none';"
	."frame-ancestors 'none';"
	."base-uri 'none';"
	."form-action 'none';");

You cannot use inline styles or Javascript events with a CSP without adding the 'unsafe-inline' item, which defeats much of the purpose of having a CSP.

Mitigates: XSS, clickjacking

SSL (HTTPS)

Most other security measures can be circumvented if an attacker can intercept the communications between a user and the server (such as via ARP poisoning). Acquiring an SSL certificate and using the HTTPS protocol will allow your site to use encrypted communications, making this impossible. Many hosting providers are now providing ways to acquire free certificates

You must also redirect insecure HTTP requests to HTTPS, such as via this htaccess rule:

RewriteEngine On
RewriteCond %{HTTPS} off
RewriteRule ^(.*)$ https://%{HTTP_HOST}%{REQUEST_URI} [L,R=301]

Strict-Transport-Security (HSTS)

Now that your site supports HTTPS, add the Strict-Transport-Security: max-age=<expire-time> header to every file served. This directs the user's browser to only use HTTPS when connecting to your site. This performs a slightly different function than a server-side 301 redirect to HTTPS, in that the browser itself will upgrade future requests to HTTPS before ever sending them to the server.

Via htaccess:

Header set Strict-Transport-Security "max-age=31536000"

Mitigates: man-in-the-middle attacks

X-Frame-Options: deny

Add the X-Frame-Options: deny header to every HTML page served. This header instructs the browser to not permit your page to be framed on another page.

Via htaccess:

<filesMatch ".(php|html|htm)$">
	Header set X-Frame-Options "deny"
</filesMatch>

Mitigates: clickjacking

X-Content-Type-Options: nosniff

Add the X-Content-Type-Options: nosniff header to every file served. In some cases, browsers will ignore the MIME type set by the server and try to determine it by looking at the file. This can be a security risk if your site hosts user-provided files, which could have a harmless extension such as .txt but be interpretted by browsers as executable code such as Javascript.

Header set X-Content-Type-Options "nosniff"

Mitigates: MIME confusion

Remove X-Powered-By

Some web technologies, such as PHP, will identify themselves in the X-Powered-By header of responses. This could help an attacker find weaknesses in the site to attack. Remove this header from all responses.

Header unset X-Powered-By

Mitigates: fingerprinting

MySQL Prepared Statements

Always use prepared statements to make dynamic SQL queries. Forming queries by concatenating strings may allow an attacker to perform SQL injection, if user-provided data can find its way into any of the components in the query. The attacker might be able to extract private data from tables, insert malicious data, or vandalize or drop data.

$query = $connection->prepare("INSERT INTO blog (id, date, title, text) VALUES (NULL, NOW(), ?, ?)");
$query->bind_param("ss", $unsafeTitle, $unsafeText);
$query->execute();

Mitigates: SQL injection

Data sanitization

Sanitize user-provided data as necessary before using it in any context. Use a function like PHP's strip_tags for text. If you expect data to be a number or bool, run it through intval, floatval, or boolval. This will prevent an attacker from inserting malicious code into pages (XSS attack).

I like to name any user-provided variable that hasn't been thoroughly sanitized yet with the prefix "unsafe". This helps me remember that that data may need to be sanitized before being used.

This applies equally to data that was previously provided by a user and stored ("second-order attack").

Mitigates: XSS, SQL injection

Hash Passwords

Passwords on the server should always be stored as hashes; the original password should not be present on the server. This will prevent an attacker who finds a way to extract data from the server from logging in with those passwords (without cracking the hashes).

In PHP, you can generate a salted password hash like so (either offline or online depending on your needs):

$passwordHash = password_hash("PASSWORD", PASSWORD_DEFAULT);

And check it like so:

$unsafePassword = $_POST['pword'];
if (password_verify($unsafePassword, 'PASSWORD_HASH'))
{
	// Restricted code
}

Mitigates: password leakage

Restrict MySQL user privileges

Scripts generating pages should use a MySQL user that has only the privileges it needs (for example, only the SELECT privilege on tables containing public data). This will prevent an attacker who finds an injection vulnerability from using it to modify or delete data.

Mitigates: SQL injection

Files on your server are public

Even if there are no links to them, any file on your server that isn't protected by an actual access control mechanism should be considered public. Do not upload .git folders, documents containing passwords, pre-minified source, etc., or an attacker might be able to enumerate and download them. Obscurity is not security.

Mitigates: data leakage, fingerprinting

Use rel="noopener" on external links that open in new tabs

When a user follows a link that opens a new tab, older browsers may provide the new page with the window.opener property, a reference to your page's window. The target page could use this to do certain operations on your page (in particular, navigate to a different URL).

Browsers will restrict this by default since late 2018, but you can be sure it's done by providing rel="noopener" on any external target="_blank" links.

<a href="https://example.com" target="_blank" rel="noopener">Link</a>

Mitigates: phishing attacks

Subresource Integrity

If your site loads resources such as scripts or stylesheets from an external domain such as CloudFlare or Google Fonts, how do you know the provider (or an attacker) hasn't inserted something malicious into them? The answer is to add a hash of the file's expected contents to the integrity parameter on the relevant HTML tag. The browser will refuse to use the content if the hash doesn't match the file served.

<script src="https://example.com/example-framework.js"
	integrity="sha384-oqVuAfXRKap7fdgcCY5uykM6+R9GqQ8K/uxy9rx7HNQlGYl1kPzQho1wx4JwY8wC"
	crossorigin>
</script>

Mitigates: supply-chain compromise

Use captchas before sending emails

This is a weird one that I learned about when it actually happened on my site. If your site accepts e-mail addresses from users, you must perform a captcha on the user before sending any mail to verify they are not a bot.

Why? If an attacker has compromised a user account on some other site (such as a bank) and intends to perform some action that might send the user an e-mail alert, they can have a bot automatically feed that user's e-mail address to any site with a form that will take it. The intent is to flood that inbox with e-mails in the hope that the user will not notice the important one. This is basically a kind of DDoS attack.

This isn't just bad for the target: it could also land your domain on a spam blacklist, which can be difficult to fix.

Google provides a free, low-friction captcha called reCAPTCHA.

Mitigates: email flooding

Serve /.well-known/security.txt

This is a simple text file on your server. It provides, at minimum, an e-mail address for security researchers to contact if they find a security problem with your site. I've received two such reports for my site that were quite helpful.

Contact: example@example.com
Preferred-Languages: en
Canonical: https://example.com/.well-known/security.txt

Mitigates: anything a security researcher might notice


Permalink

Running a laser with Marlin and the Ender 3 board

December 26th, 2021 (edited November 3rd, 2022)

I recently started working on building a laser cutter/engraver. I wanted to use the Ender 3 v1.1.4 board and Marlin firmware because I already had them and was familiar with them. This didn't end up being too complicated, but it did require a few unexpected changes, which I'll document here. This isn't a step-by-step, just a summary of what worked for me.

I'm not an electrical engineer. This process worked for me, but I don't know if it will work you. Electricity is dangerous. Lasers are dangerous. Wear appropriate laser eye protection before powering the board with a laser connected.

You'll need to know how to build and upload firmware to the Ender 3 board to follow this. I have a little bit of info about that here.

I started with Marlin configured to run the Ender 3 Pro as a 3D printer. It's possible to run a laser in this configuration by plugging it into FAN1, the header for the part cooling fan. This is a 24V PWM signal with a pretty low frequency that you can probably increase by uncommenting FAST_PWM_FAN. However, I wanted Marlin to actually understand that this is a laser to improve the LCD interface and make sure I'm getting anything Marlin can do to optimize the results. So the first thing I did was just take a pass through 'Configuration.h' and 'Configuration_adv.h' making the obvious changes (diffs):

  • Commenting/disabling the extruder axis
  • Disabling the heaters and temperature sensors
  • Disabling the status screen images except STATUS_CUTTER_ANIM
  • Most importantly, enabling LASER_FEATURE and LASER_POWER_INLINE

This will actually work just work as far as Marlin is concerned, but I didn't know that at this point, because Marlin is actually no longer sending the laser PWM signal to the FAN1 header. This is because it would like to use the chip's faster hardware PWM for the laser instead of the slower software PWM it uses for the fan. Instead, it's actually moved the X stepper to the E stepper header, and it's sending the laser signals to the X stepper driver. For more info on this, see the bottom of 'pins_SANGUINOLOLU_11.h'.

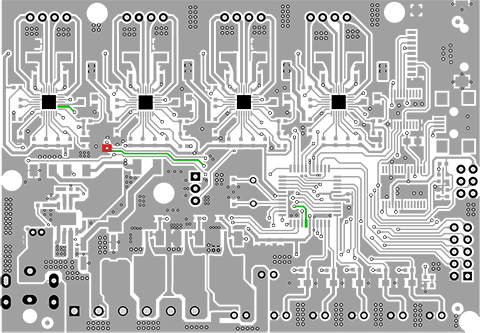
Unfortunately we can't pick those signals up from the X stepper header because there's a stepper driver between the header and the board, and we can't easily remove the driver on this board (unlike some other boards that have socketed drivers). We have to follow the traces and find another spot on the PCB to pick it up. The laser PWM is configured in 'pins_SANGUINOLOLU_11.h' to come from pin 16 (PD7) on the microcontroller. I used the microcontroller datasheet to locate that pin, then used the PCB images from GitHub to follow the trace. I highlighted the trace in green below, and chose the via marked in red as the best place to insert a wire.

Diagram of the traces of Ender 3 mainboard.

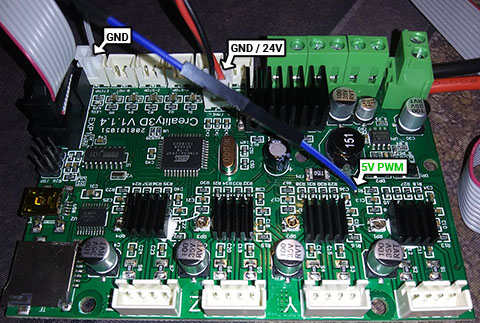
Power up the board with just the LCD attached and use a voltmeter to test the voltage between the via and ground with the laser on and off to make sure you have the right one. I cut the end off a female Dupont connector (28 AWG) and soldered it through the via.

Photo showing laser power and control wires attached to the Ender 3 mainboard.

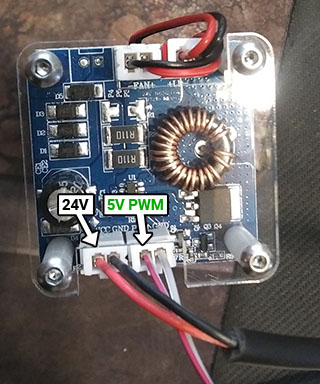
I'm using a 24V laser, so I'm giving it 24V from the FAN1 header. I commented the FAN_PIN definitions from Marlin in order to get an always-on 24V from the fan headers. You could probably pick up 5V from an unused two-pin header or 12V from the bed terminals if that's what your laser requires.

Photo showing laser power and control wires attached to the laser module.

I tested the laser using this wiring, and it was on when enabled, off when disabled, and respected the configured power output percentage, so I think the electronic configuration is good to go.


Permalink

Unity UI Gradient Shader v2

March 4th, 2021 (edited November 3rd, 2022)

Some time ago, I shared a Unity shader for coloring a Unity UI element with a 2D gradient. That post seems to get a lot of traffic, so I thought I should share my improved version as well.

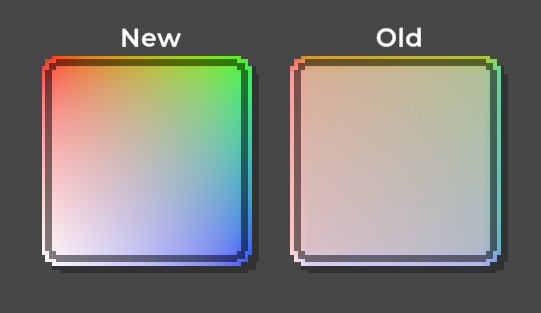
The original shader uses the first UV channel to distribute the gradient color, which means it only works well with the Simple image type. The other Image types do funny things with that UV channel. To solve this, I created a special version of the Image component that also produces a second UV channel. The second channel is always evenly distributed over the entire image, regardless of the Image Type.

Get the new component and shader here on GitHib. My shader and modifications are free to use, but the Image source code is subject to the Unity Reference-Only License.

Comparison of the new and old gradient shaders.

Future work could add support for the Tiled and Filled image types as well.


Permalink

Troubleshooting Ender 3 Pro Firmware Update

February 6th, 2021 (edited December 11th, 2021)

I recently installed Marlin firmware on my 3D printer (an Ender 3 Pro, 1.1.4 mainboard) so I could increase the size of the build space. You can find several step-by-step guides on how to do this online, and I used this one from Howchoo. It was, on the whole, very helpful, but I had to troubleshoot several unexpected issues along the way (and you should definitely expect to, also). I'm documenting them for anyone else who wants to follow the linked guide with an Ender 3 Pro. I was using a Windows 10 computer.

Wiring the Arduino (Howchoo step 5): don't forget to wire the Reset pin on the printer board to the ~10 pin on the Arduino. This isn't super clearly depicted in the pictures. If you don't do this, you'll see an error like this when burning the bootloader:

avrdude: Yikes!  Invalid device signature.
         Double check connections and try again, or use -F to override
         this check.

Error while burning bootloader.

Compiling Marlin (Howchoo step 8): when I did this, the current version of the Arduino IDE was incapable of linking the current version of Marlin. This was because it was attempting to make a long shell call to the linker that exceeded Windows' maximum length. You'll see the following error message in the Arduino IDE after clicking "Verify" or "Upload" if this happens:

fork/exec C:\Program Files (x86)\Arduino\hardware\tools\avr/bin/avr-gcc.exe: The filename or extension is too long.
Error compiling for board Sanguino.

As the call was largely using relative paths, I saw no way to easily reduce its length. Fortunately, there are plenty of other ways to compile and upload firmware (all of them are essentially wrappers around a compiler such as gcc and the uploader, avrdude, by the way), so at this point, I ditched Arduino and switched to following this guide from Marlin using Visual Studio Code.

PlatformIO Environment (Marlin step 2): the default_envs for the Ender 3 Pro in this configuration is melzi_optiboot. If you get this wrong you might see a series of errors like this on upload (the trailing hex value will vary):

avrdude: stk500_getsync() attempt 1 of 10: not in sync: resp=0x00

Uploading firmware (Marlin step 2 [okay, like this entire tutorial is in step 2]): If you haven't (successfully) connected your printer to a computer via USB before, you might need to install drivers. If that's the case, you won't see the Ender in Device Manager (under Ports) or under the Arduino IDE's Ports list. PlatformIO might give you an error like this on upload:

Error: Please specify upload_port for environment or use global --upload-port option.

All the Ender 3 Pro boards use the CH340 drivers, which you can find here. Always restart your computer after installing drivers.


Permalink

Ludum Dare 46 - The Wrecker

April 28th, 2020 (edited November 3rd, 2022)

It's been a few Ludum Dares since I participated, but last weekend I jumped in for the Ludum Dare 46 with audio designer Christian Camargo. This Dare saw a big spike in participation this time around, probably due to the stay-at-home orders in many places. The theme was "Keep it Alive". We worked in Unity with Wwise.

After starting, as always, by spamming a heap of ideas out on (virtual) paper, I started trying to mash two or more of the ideas together into a hybrid idea. "The Wrecker" was born from the union of a game about a factory poisoning a town, and my recent playthrough of Red Faction: Guerrilla and love for its granular destruction systems. We also grabbed two other elements from the doc we wanted to include: a time limit to push the player forward, and the idea that the player is also dying and needs to prioritize their own health against that of the town. That more than was enough to get started!

'The Wrecker' logo

What We Learned

Wwise

The decision to use Wwise for our audio had some pros and cons. Despite being relatively unfamiliar with it as the programmer of the team, I was able to hook in pretty easily by making a single call to posting a string-named event when audio cues should be played or stopped. Christian was able to do a lot of customization in Wwise, such as randomizing the sounds played and their parameters, that I didn't need to implement.

On the down side, however, Wwise did not play nicely with Unity's Collab source control, which only synchronizes the Unity project data and did not understand that there was also a Wwise project to synchronize. This effectively siloed off the audio work until we manually transfered the project, and I didn't hear most of the audio until a few hours before the deadline. Theoretically, Wwise is capable of building audio banks into the project that could be synced, but in the jam crunch we never got that working.

I also discovered late on Saturday (making an early test build to catch any build problems - I definitely recommend it) that WWise is not compatible with Unity WebGL builds, which are the optimal way to get Ludum Dare raters into the game quickly. Fortunately this does not appear to be affecting our ability to get ratings.

Physics Gameplay

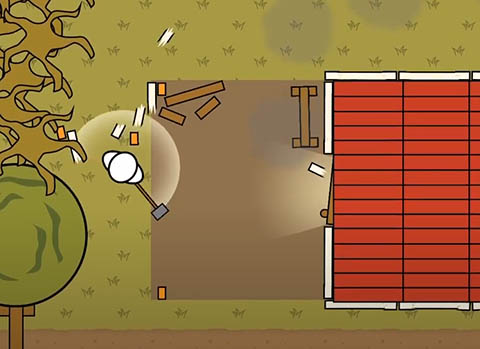
Screenshot of the player smashing down some walls.

I chose to implement the game's progression through three different weapons, each capable of breaking more objects than the last, and only the final weapon was able to break through the doors into the factory. It's a pretty time-honored design. However, I opted to implement the destruction with Unity's breakable physics joint system, in which each joint has a specified Break Force.

This was a quick way to get everything up and running, but the result was a huge number of breakable joints scattered throughout the game's prefabs, many of which needed to be carefully balanced so they were only breakable by the appropriate weapon. Any change to physics parameters, such as the player's movement speed or weapon swing speed, could throw off everything. If I did this over, I would probably try to implement explicit, hard limitations on which objects can be broken by which weapons rather than relying on the implicit interactions of the physics engine to gate crit-path gameplay.

Vector Graphics

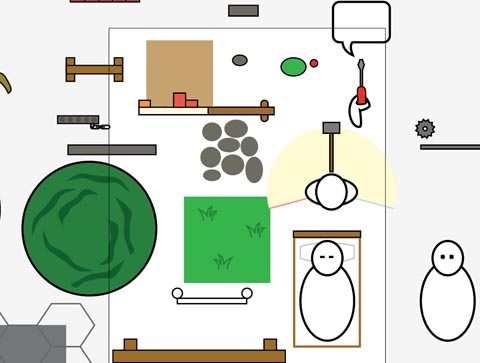
Adobe Illustrator artboard containing game graphics.

I used Adobe Illustrator to produce all the art for the game. This was very efficient, and I was able to turn out assets incredibly quickly and get back to coding. I made all the assets on two artboards (Game and UI), which made it quick and easy to ensure everything was at a consistent scale and stroke width. I used a simple visual language that I think contributes significantly to the game's clean look - collidable objects have a black stroke and background objects have none. Additionally, control prompts are always a key in a rounded white rectangle.


If you haven't check out the game yet, you can download it for free from this link, or watch a video right over here! If you are a Ludum Dare participant, you can rate the game at its Ludum Dare page.


Permalink


Previous Page
88 posts — page 1 of 18
Next Page