Blog

RSS

Sizing elements to fit their contents in Unity UI

April 10th, 2019 (edited November 3rd, 2022)

You have a UI widget that contains a number of different elements (text, images, etc). These are all children of a background element, which you want to automatically resize to encompass all of these children.

You read a bunch of forum threads and the documentation and it just won't work. Me too. I figured it out, though, so I'm documenting it here. This was written with reference to Unity 2018.3.3.

To demonstrate, I'll be creating a tooltip. I'm starting with a naive implementation - a few different widgets that are children of a VerticalLayoutGroup.
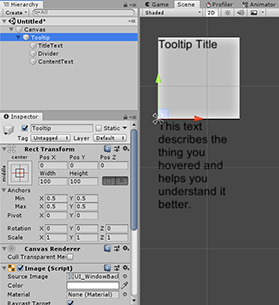
The results of the naive implemention. There are large gaps between the different elements and the background is the wrong size.

The first important concept to understand is the idea of "preferred" size. Preferred size is an internal value that some UI components have (specifically, ones that implement the ILayoutElement interface). It doesn't have anything to do with any of the values of the RectTransform on that element. Some examples of components that have a preferred size:

  • Image - The preferred size is the original size of the sprite being used.
  • Text - The preferred size is the size of the actual visible text.
  • Layout Groups - The preferred size is the size of the bounds encompassing all of the group's children.
  • Layout Element - Allows you manually set the preferred size for an object.

By default, Layout Groups look at the RectTransform size of their children when deciding how to position them, not the preferred size1. Remember that for Text components, the visual size of the rendered text is the preferred size, not the RectTransform size. So in order to include Text in a Layout Group and have it respond to the actual rendered text, we need to set the text's RectTransform size to match its preferred size.

There is a built-in component for this called ContentSizeFitter. When attached to a GameObject with a UI component on it, it can set the RectTransform size of that object to match the preferred size.

I'll attached ContentSizeFitters to each of the Text objects and set the Vertical Fit to "Preferred Size". You may have to disable and re-enable the VerticalLayoutGroup to get it to refresh. You'll also see a warning message on the ContentSizeFitter component about the parent layout group, which you can ignore for now (but see footnote 1).
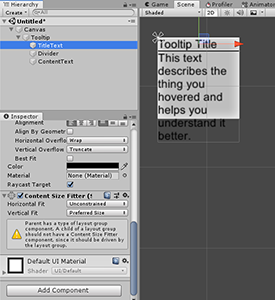
The results of the second attempt. The contents are correctly positioned but the background is still the wrong size.

This is getting closer, but the background (an Image component on the Tooltip object) isn't resizing yet. Remember that the preferred size of the VerticalLayoutGroup is the size of the bounds encompassing all its children. So let's just add a ContentSizeFitter to the VerticalLayoutGroup object and set both fits to "Preferred Size".
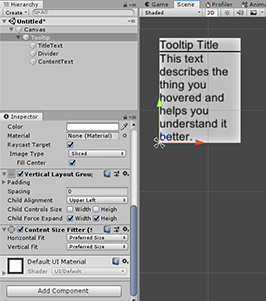
The results of the third attempt. The contents are correctly positioned and the background is the correct size.

And that's pretty much it. You can use the Padding and Spacing properties on the Layout Group to clean it up.

1 Layout Groups have two checkboxes for "Child Controls Size", one for the Width and one for the Height. Checking these boxes causes the Layout Group to automatically perform the function of the ContentSizeFitter - changing the RectTransforms of the children to match their preferred size. This allows you achieve the same result without ContentSizeFitters, and it is apparently how Unity now intends it to be done; however, it affects ALL the children of the layout group. That includes the divider in this case, which we didn't want to resize. We could have fixed this by adding a LayoutElement component to the divider and setting its preferred height to 1.

One more thing

What if I wanted to introduce a second part of the background - a border? Ordinarily, I would make the border a child of the background and set the RectTransform Anchors to stretch both dimensions. But that won't work in this case because the background can no longer find the content items (Layout Groups only operate on their immediate children), so it won't grow to match them.
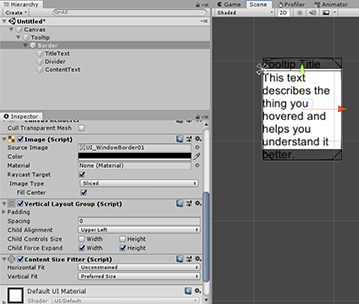
The results of attempting to add a border. The border is the correct size, but the background is not.

What we really want in this case is to pass the size up from a Layout Group on the border. I move the Layout Group and ContentSizeFitter from the background to the border. Now the border is sizing correctly, but I need to get the background to match it as well.

Remember that Layout Groups set their own preferred size to the size of the bounds encompassing all of the group's children. So we can achieve this by adding a Horizontal or Vertical Layout Group to the background (they will produce the same result with only one child), which sets the preferred size, and then adding a ContentSizeFitter to the background, resizing the RectTransform to match.
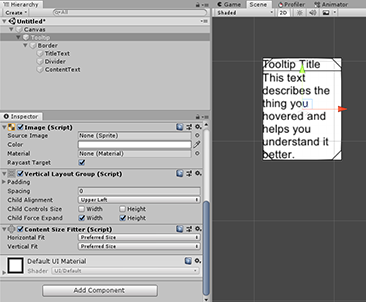
A tooltip with a correctly-sized border and background.
Permalink

Unity UI Gradient Shader

February 14th, 2019 (edited November 3rd, 2022)

EDIT: An updated version of this shader that supports Sliced images is available here.

I created a variant of Unity's default UI shader; instead of using a solid tint color across the entire element, it uses a four-color gradient. The source is MIT-licensed and available on GitHub.

Unity UI Gradient shader example image


Permalink

Unfair (Board Game) Card Blanks

June 11th, 2018 (edited November 3rd, 2022)

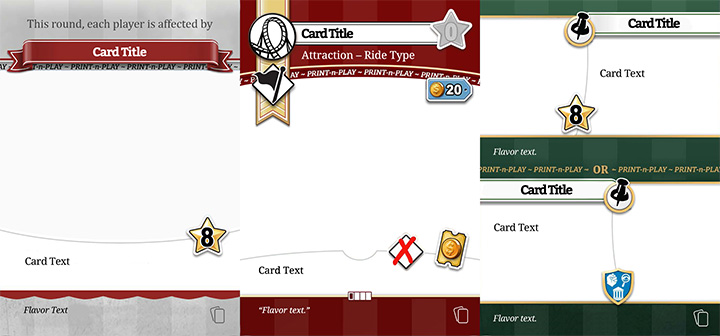
In a departure from my usual medium of digital games, I've created blank card templates for every type of card in the game Unfair. These are based on the print-and-play version of the game, so they have some compression artifacts and Print-And-Play watermarks, but they do nicely for personal use. They're in Photoshop PSD format. Click this image to download.

Unfair card templates preview image


Permalink

UCI Game Developers Week Lecture: Tools in Unity

May 27th, 2018 (edited November 3rd, 2022)

I spoke yesterday at the UC Irvine Video Game Development Club's Game Developers Week. I discussed the four major methods for creating tools in Unity (property drawers, custom inspectors, editor windows, and gizmos) to help develop and debug Unity games, and showed some specific examples of each from Pillars of Eternity and Pillars of Eternity II: Deadfire. I also shared about my tool for browsing references to and from any asset in a Unity project, which is now available on Github.

Click this image to view the slides:

Making huge games in Unity with tools, by Brian MacIntosh


Permalink

ASCII Art Generator

March 26th, 2018 (edited November 3rd, 2022)

A few years ago, I wrote a program that could produce ASCII art from raster input images. I was going to use it to generate paperdoll images for the equipment screen in an ASCII roguelike game. It worked great, but it was written using XNA and the images to convert had to be set at compile-time. Ick!

Now, I've finished converting the program to Javascript/HTML5, and made a number of other improvements. You can try it right here!

http://brianmacintosh.com/asciiart/

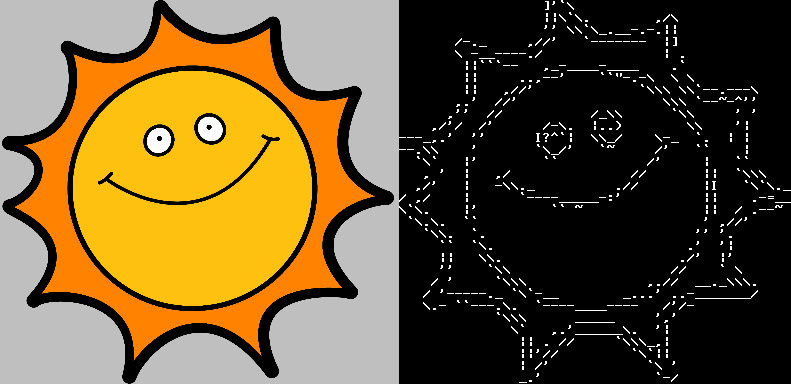
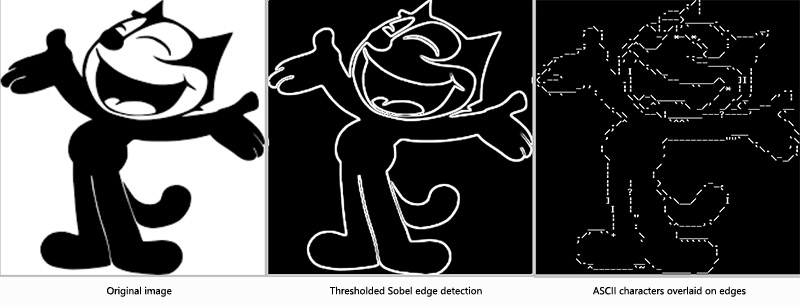
ASCII Art generator sample

You can find a number of ASCII art generators on the internet, but they usually operate simply by selecting characters with more or less "ink" based on the brightness of each character-sized cell in the image. This method requires pretty large output sizes for the image to be recognizable. My generator uses edge detection to find characters that actually follow the lines of the input image, which holds up a lot better at smaller sizes. The downside is that noisier images (such as photographs) can produce noisy output that requires a lot of cleanup, though there are some steps that try to mitigate this.

The source code is under the GPL (3.0), and images produced with the page are free to use. You can visualize what each step looks like by adjusting the Debug Stage in the Advanced settings, and there are a number of sliders to play with the tweak the results. Here is an overview of the steps in the algorithm.

  1. Greyscale the input image.
  2. Gaussian blur the image to reduce noise.
  3. Use Sobel edge detection to produce a greyscale image representing the edges present.
  4. Threshold the edge-detected image, leaving us with a black image with white lines.
  5. (Optional) Dilate the image, thickening the edges.
  6. (Optional) Erode the image, reducing the edges. When used in combination with equivalent dilation, this can help reduce noise.
  7. Blur the line image. This makes it easier for us to match up characters in the next step when the best match doesn't precisely line up with the grid.
  8. Split the image into a letter-sized grid. For each grid cell, overlay ("convolute" is the technical term) each ASCII character over the content. Whichever character best matches the content of that cell is the one we'll use. We also try the characters at small offsets to try to catch, say, a vertical line that doesn't land quite in the middle of a cell.

ASCII Art steps: original image, Sobel edge detection, overlaid ASCII characters


Permalink


Previous Page
88 posts — page 3 of 18
Next Page